TradingView Alerts to KuCoin - Full Guide
Full guide on how to connect TradingView alerts to KuCoin

Morten Madsen
Last Update 2 yıl önce
Step 1) Setup KuCoin
Login to your Cordly account and go to "Account & Integration"
Then click on "Add Account" and choose KuCoin spot/margin or KuCoin Futures.
Open a new browser window, and go to KuCoin to log in.
When you have logged in to KuCoin, then go to "API management" in the top right corner and then click "Create API"

Give your API a name and type an API Passphrase (It's important you remember this since it's used when connecting with Cordly later).
Tick the box saying "Trade" and also what IP Restrictions you want to use.

Click next and fill out the security information to continue. You will receive an email from KuCoin where you have to activate the API. When you have activated the API you will be shown your API key and API secret key. You need to copy it into Cordly along with your API Passphrase.

When you have inserted the correct information then click "Add New Account". You have now connected KuCoin with your Cordly account.
Step 2) Connect with TradingView
1. Login to your Cordly account and go to "Account & Integration". Then click on "Get Credentials / Get TradingView Webhook" to get the webhook needed for TradingView.

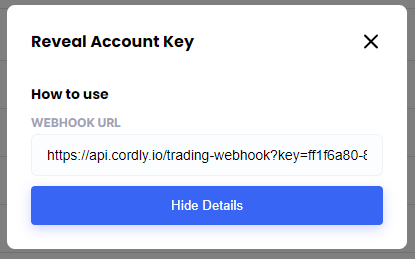
2. When you click "Get Credentials / Get TradingView Webhook" you need to type your Cordly password to see the URL.
Copy the URL from the "Webhook URL" field. This URL is needed in TradingView
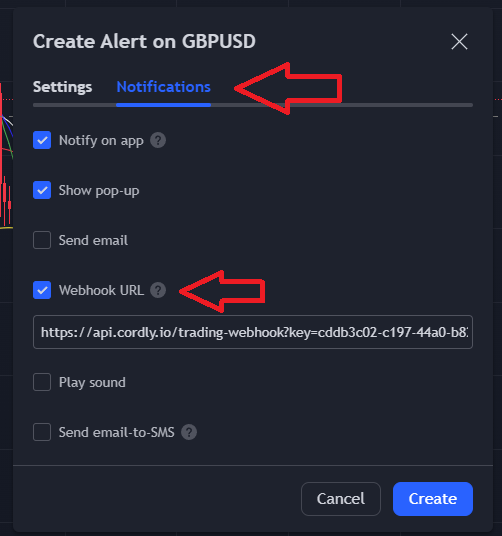
3. When creating an alert inside TradingView you will need to paste that URL into the "Webhook URL". You only need to do this one time and then TradingView remembers the URL until you change it. (To create an alert in TradingView, just right-click and click "Add alert". BUT note that you can set up a potential trigger for a trade when doing so.)
4. You have now successfully connected TradingView with your Cordly account. All future alerts will be sent to your Cordly account. To execute trades you will need to write the correct message in the message field so Cordly knows what to do when the alert triggers.
We have a full guide for TradingView syntax here
Step 3) Configure your trading settings
Before you start trading you will need to configure your trading settings. You find these on the left of your Cordly Dashboard under "Trading Settings". Select your account and the settings available will show.
To set up your settings correctly you need to do the following:
1) Main settings (also called trading settings) -> Select the trading settings you want Cordly to send with the trade when executing the signal.
The minimum requirement of settings is trade size, and the number of Take profit levels you want to copy. See arrows below

2) Specific settings - Click "add new pair" and select the trading pairs you want to enable to trade. When you have added them to the top list, then click Save


3) After saving your pair list, you see a column named "Alias". This column is used when your signal provider uses a different name for the trading pair than the exchange uses. Example: Your broker has the trading pair BTC/USDT:USDT but your signal provider writes BTCUSDT in their signals. Next to BTCUSDT you need to write Gold. You can use the blue buttons that match the right syntax to autofill all trading pairs with that alias. In this example it's the button called PAIRUSDT you would use.
Another example is if your signal provider writes BTC/USDT then it's the button called PAIR/USDT to use.
